
Clean an Email List, Keeping a clean email list is one of the best things you can do for your email marketing. If you’re a beginner wondering how to do it, don’t worry – list cleaning isn’t complicated, and it can dramatically improve your email success. In this step-by-step guide, we’ll walk through exactly how to clean an email list, why it’s important, and some tips and tools (like Sendrella) to make it easy. Let’s dive in!
Why Clean an Email List Matters
First, a quick primer: “cleaning” an email list means removing bad or unengaged addresses. Over time, email lists accumulate invalid emails (that bounce), spam traps, and unresponsive contacts. Industry stats show about 22–30% of your email contacts go bad each year – people change jobs (and thus emails), abandon old addresses, or make typos when signing up. If you keep sending to these addresses:
- Your bounce rate increases, hurting your sender reputation. (Experts recommend keeping bounce rate under 0.5% for best results – yes, that’s a very low bar, and cleaning helps you meet it).
- You risk hitting spam traps (which can land you on blocklists).
- Your open rates and engagement drop (since a chunk of your emails aren’t reaching real people).
- You pay more – many email services charge by list size, so why pay for ghost contacts?
In short, a dirty list can drag down your whole email program. Cleaning it gives you better deliverability, more accurate metrics, and cost savings. One case study even showed open rates jumping from under 10% to 46% after a thorough list cleaning (Source). Ready to get those kinds of results? Here are the steps.
Step 1: Assess Your Current List Health
Before you start pruning, get a sense of your list’s status:
- Check your bounce rate from recent campaigns. Is it above ~2%? A high bounce rate (especially hard bounces) is a clear sign you need cleaning.
- Look at engagement. What percentage of your subscribers haven’t opened or clicked any email in, say, 6 months? If a large chunk is “inactive,” your list may be due for scrubbing (more on handling inactives later).
-
Identify obvious issues. Do you notice any addresses that look fake (e.g.
[email protected]), role-based (likeadmin@orsupport@), or weird domains? Jot those down. Part of cleaning is removing these likely problematic contacts.
This assessment will give you a baseline and help prioritize what to clean first.
Step 2: Remove Obvious Bounces and Invalid Emails
Start with the low-hanging fruit:
- Delete addresses that have hard bounced. Most email service providers automatically mark an address as “bounced” after a campaign if it was undeliverable. Filter your list for any contacts with a hard bounce status and remove them. There’s no point keeping an email that has already returned a “recipient not found” error – it will never work. Continuing to send to such addresses can hurt your sender rep (ISPs recommend dropping hard bounces quickly (source)).
-
Remove clearly invalid entries. Sometimes people accidentally enter “gmail.con” or “yahoo@com” – obvious typos. Scan for addresses with formatting mistakes (no “@”, multiple “..” etc.). Also, cut out ones like
test@testingor any that don’t have a valid domain. - Eliminate duplicate emails. If the same address is on your list multiple times, it could lead to sending duplicate emails (and annoyance). De-dupe your list so each contact is unique.
-
Scrub role accounts. Addresses like
info@,sales@,support@– these are role-based accounts. They often aren’t tied to a single person and tend to have low engagement. They can also be sources of spam complaints (multiple people may check them). It’s usually best to remove role accounts from marketing sends (sendgrid.com) unless you have a specific reason to include them.
These steps are a basic cleanup that you can do in a spreadsheet or within your email platform’s UI. Think of it as cleaning out the obviously “bad apples” first.
Step 3: Use an Email Verification Tool (Bulk Clean Your List)
Now for the heavy lifting: using an email verification service to validate your contacts. This is a crucial step to catch less-obvious bad emails (e.g. ones that appear valid but aren’t deliverable, temporary addresses, etc.). Here’s how to do it:
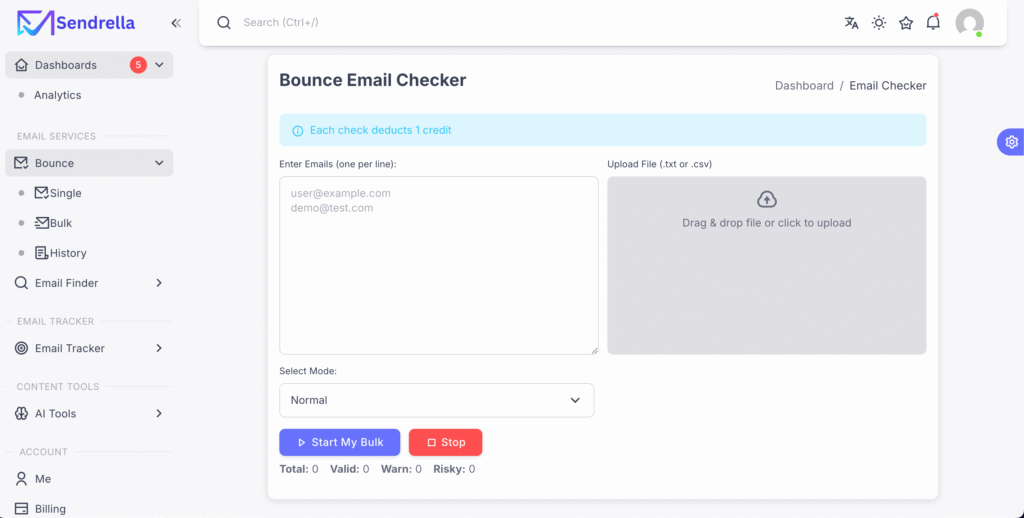
- Choose a verification service. There are many (NeverBounce, ZeroBounce, etc.), but since you’re reading Sendrella’s blog, we’ll humbly recommend Sendrella’s Email Verification. It’s highly accurate and budget-friendly (you can even start with 100 free credits on the Free forever plan).
- Export your email list. Get your list of contacts (usually in CSV format) ready for upload. Make sure it has at least the email address column.
- Upload to the verifier. In Sendrella, you’d go to the dashboard and upload the CSV for bulk validation. The tool will then check every address against multiple layers – syntax, domain MX records, active, passive, and more – and label each email as “Valid,” “Invalid,” “Disposable,” “Catch-all,” etc.
-
Review the results. Once the verification is done, download the results file. Focus on removing all “Invalid” emails – these are confirmed bad (non-existent or undeliverable addresses). Example: if
[email protected]comes back “Invalid – domain not found,” you definitely should delete it. - Consider “Catch-all” and “Risky” categories. Some emails might be flagged as catch-all (the domain accepts all emails, so it’s unconfirmable if the user exists) or risky (temporary addresses, full mailbox, etc.). You have a choice here: a conservative approach is to remove those too, to be safe. Or you might keep them but monitor engagement closely. If you’re a beginner, it might be wise to suppress catch-alls for now, since they can often bounce or be unresponsive. (You can always try reaching out to those via a separate campaign later.)
- Implement the clean. Remove all the invalid addresses (and whichever other categories you chose to drop) from your main email list. Now your list is significantly cleaner!
Tip: Verification tools like Sendrella not only catch bounces, but also things like disposable emails (e.g. those 10-minute emails) sendrella.com. Those are people who signed up with a throwaway address – they’re unlikely to ever engage, and sending to them can be harmful. The tool will identify them so you can remove them too.
Step 4: Remove Unengaged Subscribers (Scrub Your List)
Now that the blatantly bad emails are gone, let’s tackle the unresponsive ones – those who might be real people but haven’t engaged in a long time. Keeping a large chunk of chronically inactive subscribers is detrimental: mailbox providers see low engagement as a sign your emails aren’t wanted. Here’s what to do:
- Define “inactive” for your list. A common definition is no opens or clicks in the last 6 months (or 3 months if you email daily, or 12 months if you email rarely). Identify subscribers who meet this inactivity criteria.
- Attempt a re-engagement campaign. Before you drop them, you can try a win-back email. Send a targeted email to these inactive folks saying something like “We miss you – do you still want to hear from us?” Offer an easy way to confirm they still want in (or a link to update preferences). Sometimes, you’ll revive a few relationships this way.
- Say goodbye to the rest. For those who don’t respond to the re-engagement attempt, it’s time to let them go. It may feel hard to delete subscribers (especially if they were once leads or customers), but if they haven’t engaged in a year, keeping them on just hurts your overall metrics. Removing them will raise your open rate and click rate because your mailings will only go to people who care. And it will protect your deliverability because you’re signaling to ISPs that you only email interested recipients.
- Segment instead of delete (optional): If you’re not ready to permanently delete, you could move inactives to a “suppressed” segment. You won’t include them in normal mailings, but you keep them in your system just in case. However, be disciplined not to accidentally email that segment.
Regularly addressing unengaged contacts is called list scrubbing. It goes hand-in-hand with cleaning. Think of cleaning as removing hard bounces/invalids, while scrubbing is curating for engagement. Both are important for list hygiene.
Step 5: Establish a Regular Cleaning Schedule
Cleaning your list is not a one-and-done task – it’s an ongoing maintenance routine (just like brushing your teeth!). To keep your list healthy:
- Set a schedule to verify and scrub. A good rule of thumb is every 3–6 months do a check, or before any major campaign. Large senders (100k+ contacts) might even clean monthly.
- Clean before big seasonal sends. For instance, before your holiday newsletter blast or a product launch announcement, ensure you run the list through verification so you’re not hitting a bunch of bad addresses during that crucial send.
- Monitor sign-ups and form entries. Use double opt-in or a real-time verification API on forms to catch typos as they happen. (Sendrella’s WordPress plugin is an example that blocks fake emails on signup (sendrella.com))
- Never buy email lists. This is more prevention than cleaning, but it must be said: purchased lists are rife with bad emails and traps. They will destroy your deliverability. Focus on growing organically, then clean what you have. (As SendGrid’s experts put it: “Don’t purchase lists…you may even find yourself on a deny list as a result.”)
- Use sunset policies. Make it policy that if someone hasn’t engaged in X months, you’ll stop mailing them until they re-opt-in. This way your list naturally prunes itself over time.
By sticking to a routine, your list will remain “squeaky clean” and performance will stay strong. Remember, email list hygiene is like normal hygiene — it should be a regular part of your routine!
Step 6: Enjoy the Benefits of a Clean List
After following the steps above, pat yourself on the back – you now have a leaner, healthier email list. What can you expect next?
- Higher deliverability: Fewer bounces and higher engagement signal inbox providers that you’re a reputable sender. Your emails are more likely to land in Inbox vs. Spam. You might notice more of your Gmail recipients actually seeing your emails (no more getting junked due to prior high bounce rates).
- Improved open and click rates: With the dead weight gone, your percentage metrics should jump. Like we mentioned earlier, one company saw their open rate jump to 49% after cleaning their list. Even if your lift isn’t that dramatic, you will see an uptick. It’s not magic – it’s math. If only engaged people remain, then naturally a larger fraction of recipients will open.
- Better conversion rates: You’re now essentially segmenting out uninterested folks. Your content reaches a more receptive audience, which can mean more sales, sign-ups, or whatever your email goal is.
- Cost savings: You might find you trimmed say 10,000 bad emails from a 50,000 list. If your ESP charges, for example, $X per 1,000 contacts, that’s immediate savings. Plus, you avoid potential penalties or account suspensions some providers impose if your bounce or complaint rates were high.
- Peace of mind: There’s a comfort in knowing you’re following best practices. You don’t have to worry about being labeled a spammer because of stale data. You’re proactively protecting your sender reputation.
Cleaning an email list might have seemed intimidating, but as we’ve shown, it’s quite straightforward – especially with the right tools. Sendrella can handle the heavy verification step for you with precision and speed (and remember, it even integrates with your workflow via API to automate this). With a clean list in hand, you’re set up for email marketing success. High deliverability, happy subscribers, and better ROI – that’s the reward of good email hygiene.
If you’re curious, check out Sendrella’s Features page to see how our verification works, or visit our Blog for more tips on improving email deliverability. And if you haven’t tried it yet, our Pricing page outlines a free trial so you can clean a chunk of your list at no cost.
Leave a Reply